
Welding polypropylene rope with a soldering iron is fast and needs very little equipment. With a soldering iron you can make a long weld joining two ropes as well as a spot weld on a small area. This guide covers both methods and a jig that holds the ropes while you weld. The other option is welding with a heat gun, which leaves both of your hands free.
For welding polypropylene rope, get a soldering iron with stepless temperature control: a transformer soldering gun or a tinsmith’s soldering iron.
Weld the rope with a soldering gun fitted with a specially shaped soldering loop. The loops are fairly thick, so it is a good idea to have them ground to a thinner edge. Be careful: a very thin edge bends and can even break. You can buy soldering loops in various shapes separately for your soldering gun. If you use a tinsmith’s soldering iron, have its tip ground to a thin edge too.

Welding follows the same rule as cutting rope (a temperature of 170 to 180 °C):
- a low temperature (below 170 °C) will not melt the material enough for a weld,
- a high temperature (above 180 °C) degrades the material in the weld and leaves large melted lumps.
How to weld rope with a soldering iron
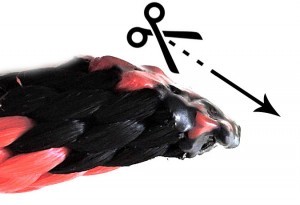
- Cut the end of the rope at an angle of 45 to 55°. More on this in How to Cut Polypropylene Rope.

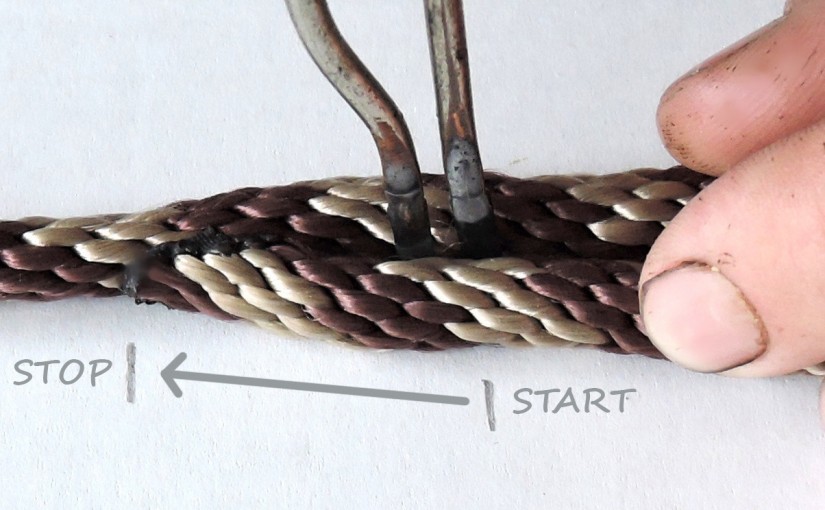
- Lay the rope on a flat surface. Mark the start and the end of the weld. Place the tapered tip of the rope at the marked start of the weld, line it up and hold both pieces of rope together with your fingers.

- It is best to weld from the far end of the weld toward the tapered tip. Insert the soldering gun between the ropes at the start of the weld and switch it on. The rope melts within 1 second. Draw the edge toward the tapered tip in one smooth motion. You can move quickly (polypropylene rope melts fast in the weld). Within a few seconds the material in the weld cools and the weld is done.

A jig made from rope clamps to hold the rope
So that you do not have to hold the ropes together while welding, make a simple jig with rope clamps. You will find rope clamps in our range in sizes from 4 to 16 mm. You do not need a separate jig for every rope size. 3 to 4 clamp sizes are plenty. The full procedure for making a leash from rope and a clamp is in our guide to making a rope dog leash. We do not sell soldering irons, hot knife cutters or heat guns; you can get them in tool shops or from tinsmith suppliers.
- Screw the rope clamps onto a board measuring 7 × 2 × 30 cm with two wood screws. It helps to squeeze the clamps closed with pliers.
We strongly advise against gluing the clamps to the board with a hot glue gun. Hot glue is thermoplastic, and the heat from the soldering iron would loosen the clamp after a few uses.

- Put the rope into the jig and proceed the same way as when welding without it. The clamp holds the ropes together, so you do not have to touch the hot material.

Spot welding
The advantage of welding with a soldering iron is that you can weld rope on a small area only. The size of the weld matches the size of the soldering loop. This is useful wherever you need to join ropes on a very small area. Spot welding with a soldering iron is accurate and the joint is strong.

How to weld polypropylene rope with a heat gun
A heat gun is handy when you need both hands free to handle the rope. You can use it, for example, when making a rope dog leash; you will find rope and rope clamps in our range.
- First, cut the end of the rope at an angle of 45 to 55°. You will find the procedure in How to Cut Polypropylene Rope. Mark the length of the weld on the rope beforehand (on a leash it must be slightly shorter than the rope clamp that will cover the weld).
- Lay the heat gun on the table so that the nozzle points neither at you nor at the cable, and let it heat up. Set the temperature so that the cut end of the rope melts within 1 to 2 seconds without scorching the material (test the setting on an offcut of rope). As with a soldering iron, too low a temperature will not melt the rope and too high a temperature degrades the material.
- Over the stream of hot air, heat:
- the cut end of the rope
- and the spot where you will lay the end of the rope.
Press the ropes together and hold them for a few seconds. Within a few seconds the material in the weld cools and the joint is done.

When welding polypropylene rope with a heat gun, it is better to start the weld at the tapered end of the rope.
- Make a longer weld starting from the tapered end: hold the rope by the loop you have formed, heat it again starting at the first weld (below the welded tip) and, moving the rope straight down, heat the length of weld you need.

- Press the heated parts together with your fingers and hold them. Wear leather finger guards, because the temperature is high even a few centimeters from the weld.

A heat gun cannot spot weld polypropylene rope or make very short welds. Use a soldering iron for those.
When welding polypropylene rope, follow safe working practice so that you do not get burned by the soldering iron, the heat gun or melted polypropylene from the rope. The temperature is high not only at the weld but also a few centimeters away from it. We recommend always wearing finger guards for this job (leather ones are best) and working in a well-ventilated room; melted polypropylene gives off unpleasant fumes.
Pethardware.com
The only shop you’ll ever need for crafting collars and leashes.
Visit Pethardware.com