
For manual riveting you need a rivet, a punch or punching pliers, rubber pad, riveting and small hammer.
Rivet size
The properly selected size of the rivet is the first precondition of a quality executed riveted joint. Rivets are manufactured in standardized sizes. It is necessary to know the thickness of the joined materials for the correct selection of the rivet. The height of the shaft for thinner materials should be optimally about 1-2 mm, for thicker materials of 2-3 mm longer than the thickness of the joined materials.
Punching pliers
The punching pliers has a rotating head with a few punch points of different sizes, so their replacement is a matter of a few seconds. They are suitable for making holes in leather materials to a thickness of 2 mm. It is required to use a punch for greater thickness. The longer grip of the pliers ensures high pressure on the cutter even with a minimum effort. Professional punching pliers have punches made of solid steel (1.4 – 4.7 cm), the handles drop forged and the anvil made of brass. You will get a lifetime warranty for punching pliers. In case of dullness or damage, it is possible to replace the individual punch points. The punch points (0.3 – 0.5 cm) cannot be replaced on the cheaper Economy punching pliers.
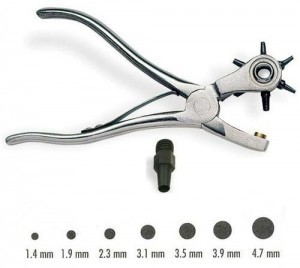
Professional rotary punching pliers 3230-00
Punch (punch point)
A punch is a steel tool through which you can cut a hole for the rivet through two thinner materials superimposed at the same time. Punching sets contain six removable steel punch points at of diameters from 1.9 to 4.7 mm. It is also possible to acquire round punches individually, in diameters from 1.59 to 16.8 mm.
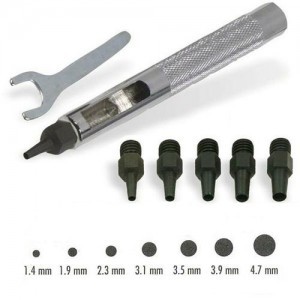
Punching set 3003-00
Rubber pad
The soft rubber pad protects the blade of the punch point against becoming dull. It is possible to make notches with the punch to a thicker rubber block. A flexible plastic board may be used for occasional riveting. Plates of soft wood were previously used. The quick blunting of the punch point and board depreciation were the disadvantages.
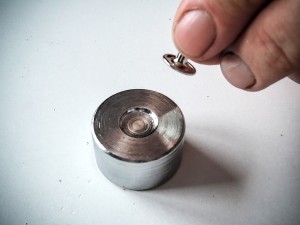
Riveter
A riveter is a hand tool having a small (round, semi-round or drupaceous) hollow on one side, which creates the head of the desired shape after unriveting. The riveter is different for each head type and rivet size:
- Riveter for opened saddlery rivets
- Riveter for closed saddlery rivets – can be used for opened rivets after turning the anvil.
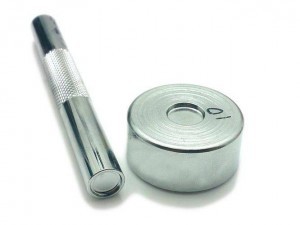
Saddlery rivets riveter 8101
The procedure for manual riveting
1. Cutting out holes for the shaft of the rivet
Riveting combines two or more superimposed materials. Therefore, it is necessary to punch a hole corresponding to the diameter of the shaft of the rivet in the joining materials. The hole diameter for the rivet must not be too tight or significantly greater. If the hole is too tight, the shaft will not go through the hole. If conversely it is too large, there is a risk of ripping out the head of the rivet from material under a tensile load, especially in rivets of smaller sizes.
When cutting out, the edge of the hole slightly deforms and the hole is larger than the cutting tool. Deformation is caused by a gouging process. In the first phase, there is a compression of the material using the tool, the so-called layers’ densification. The actual perforation of the material occurs during the second phase. The compressed material returns to the original shape after gouging and the hole is slightly larger than the cutting tool. There is a rule that the thicker the material is, the greater the deformation. This must always be remembered. You will not find out the correct size of the punch by simply attaching the shaft of the rivet to the hole of the punch point. The size of the punch point must be slightly smaller than the diameter of the rivet shaft. The best way to determine the size of the punch point is to test the size of the hole in a piece of material.
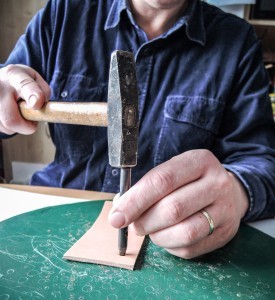
We will mark the place on the material where we want a rivet. We place the material on a punching pad, put a punch (sharp side) perpendicular to the place where we want to punch a hole and strike the top of the punch (straight side) with a hammer. The material should be perforated with a single hammer blow. The punch should be hacked into the punching pad by about 0.5-1 mm. The hole will be free of burrs and have smooth surface from both sides. Rotary punching pliers can be used instead of a punch.

2a. Unriveting the opened rivet
We place a shaft from the back side into the prepared hole. From the front side, we place the rivet head on the shaft. We put a rivet prepared for unriveting on a steel cube with a flat surface (something hard, the best iron, something that is unstretchable). If we dispose with a rotary anvil from set #8101, we just use it. We place a punch in a perpendicular manner at the head of the rivet and unrivet the rivet by hammer blow (into the center of the rivet if possible, otherwise the rivet will be unriveted in a skewed manner).
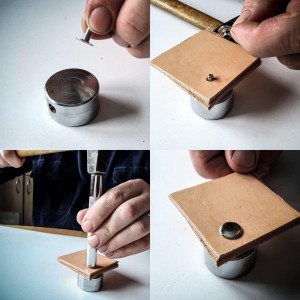
It is important to tap a hammer into the riveter only once and with more force. When you tap again, you will make scratches to the rivet or to the joining material.
With a blow to the rivet head of the riveter, the shaft is deformed in the rivet head, increases its diameter and thus create a dismountable joint.
For a properly executed riveted joint it is important to:
- to select a rivet of correct shaft size to the thickness of the joined materials
- when riveting, to develop sufficient compressive force during unriveting
- the blow of the hammer must be perpendicular to the riveter
- to use the proper tools and equipment for the given size of the rivets for riveting
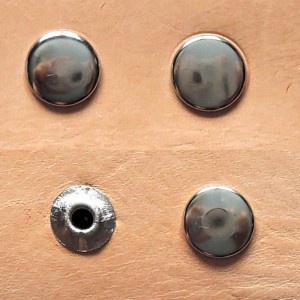
a) wrong unriveted rivet (hammer blow on the tool was not perpendicular)
b) well unriveted rivet
2b. Unriveting of a closed rivet
The unriveting procedure is the same, the only need is to rivet on a special application preparation having a hollow of the rivet’s head size and shape. Thus we achieve the rivet having a round head from both sides.
When a closed rivet is unriveted on a flat surface, from a technological point of view everything is fine, but the rivet will not be so visually attractive and thus the aesthetic value of the product is reduced. When using the closed rivets on the product, it is also important to use appropriate tools and equipment. A rivet is a visible part of the product; the quality and method of performing riveting are determined by the manufacturer’s professionalism and skill.
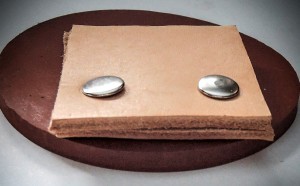
Obverse and reverse side: a) open rivet, b) closed rivet
Pethardware.com
The only shop you’ll ever need for crafting collars and leashes.
Visit Pethardware.com